In order for an alert to work in the toolkit make sure the related feature is enabled
Using Placeholders With Confirmation/Contrarian Alerts
Any Alert() Function Call
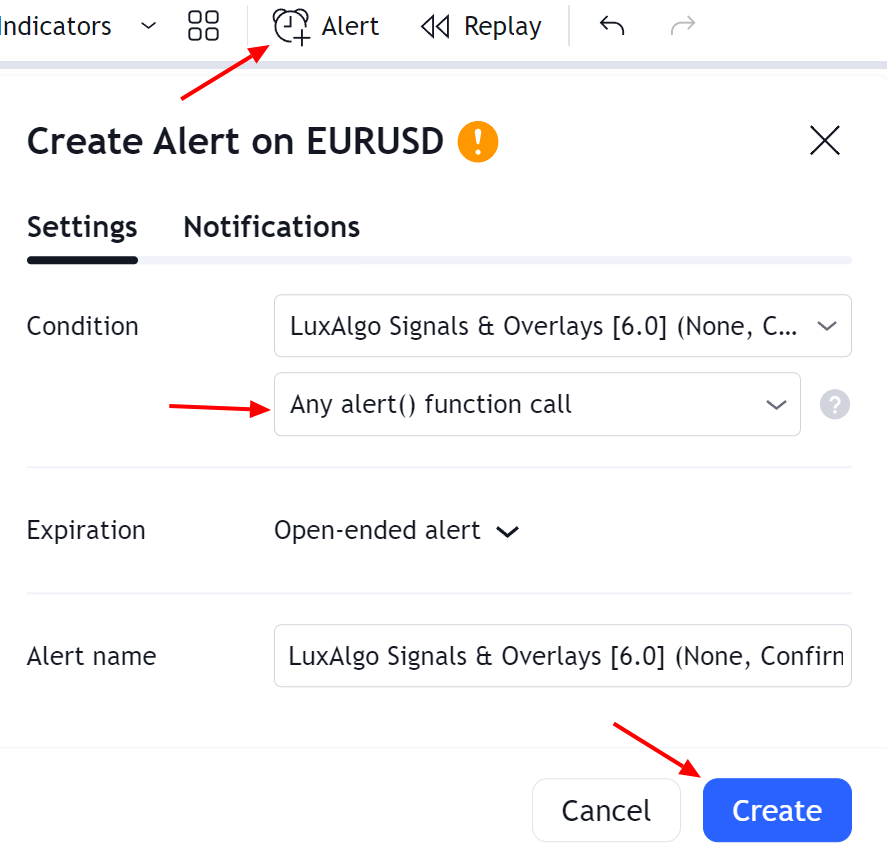
The any alert() function call alert condition allows to create one alert using various conditions, this allows to bypass the limit of one alert for free users as well as making the process of updating many alerts faster and easier. To create such an alert go to the indicator settings, and scroll down to the ‘ANY ALERT() FUNCTION CALL CONDITIONS’ section.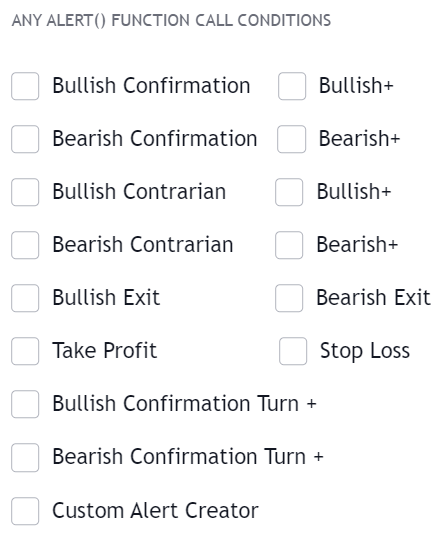
This alert would use once per bar close by default.
All-in-one alerts do not differ from regular alerts, they will be using the same indicator settings as the one used during their creation. Note however that you cannot set a custom message for all-in-one alerts, the message displayed when the selected conditions trigger will be the same as the one used in the same individual alert conditions.
Any Alert() Function Call Message
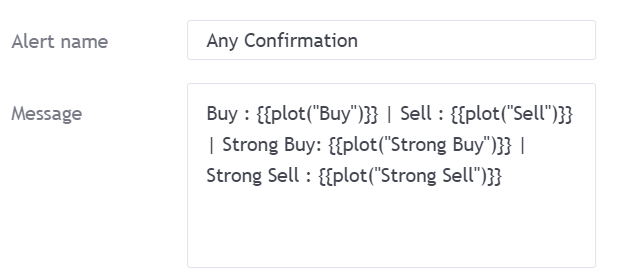
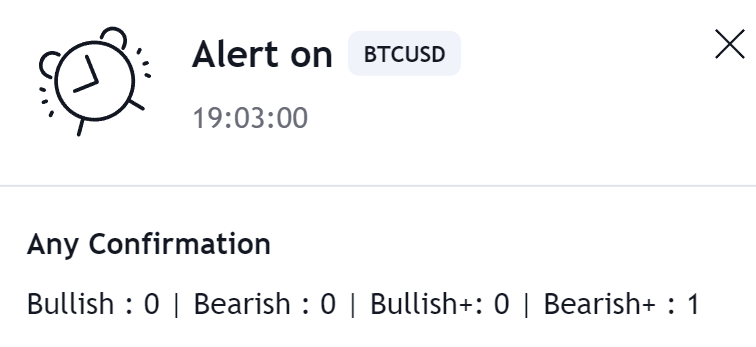
Users can set a custom message that will be used when an “any alert() function call” condition is triggered in the message field below the list of conditions. Users can use placeholders to customize messages and return useful information, the following placeholders are supported:Symbol Placeholders
Time Placeholders
Data Placeholders
Indicators Placeholders
Format as JSON
Use the following message template to receive “any alert() function call” messages in the JSON format:Updating Alerts Using Any Alert() Function Call
If you already set an any alert() function call alert and want to change the indicator settings or want to toggle on another condition all you need to do is edit the alert you want to update, select the second instance of the indicator in the first Condition drop-down menu and then click on save.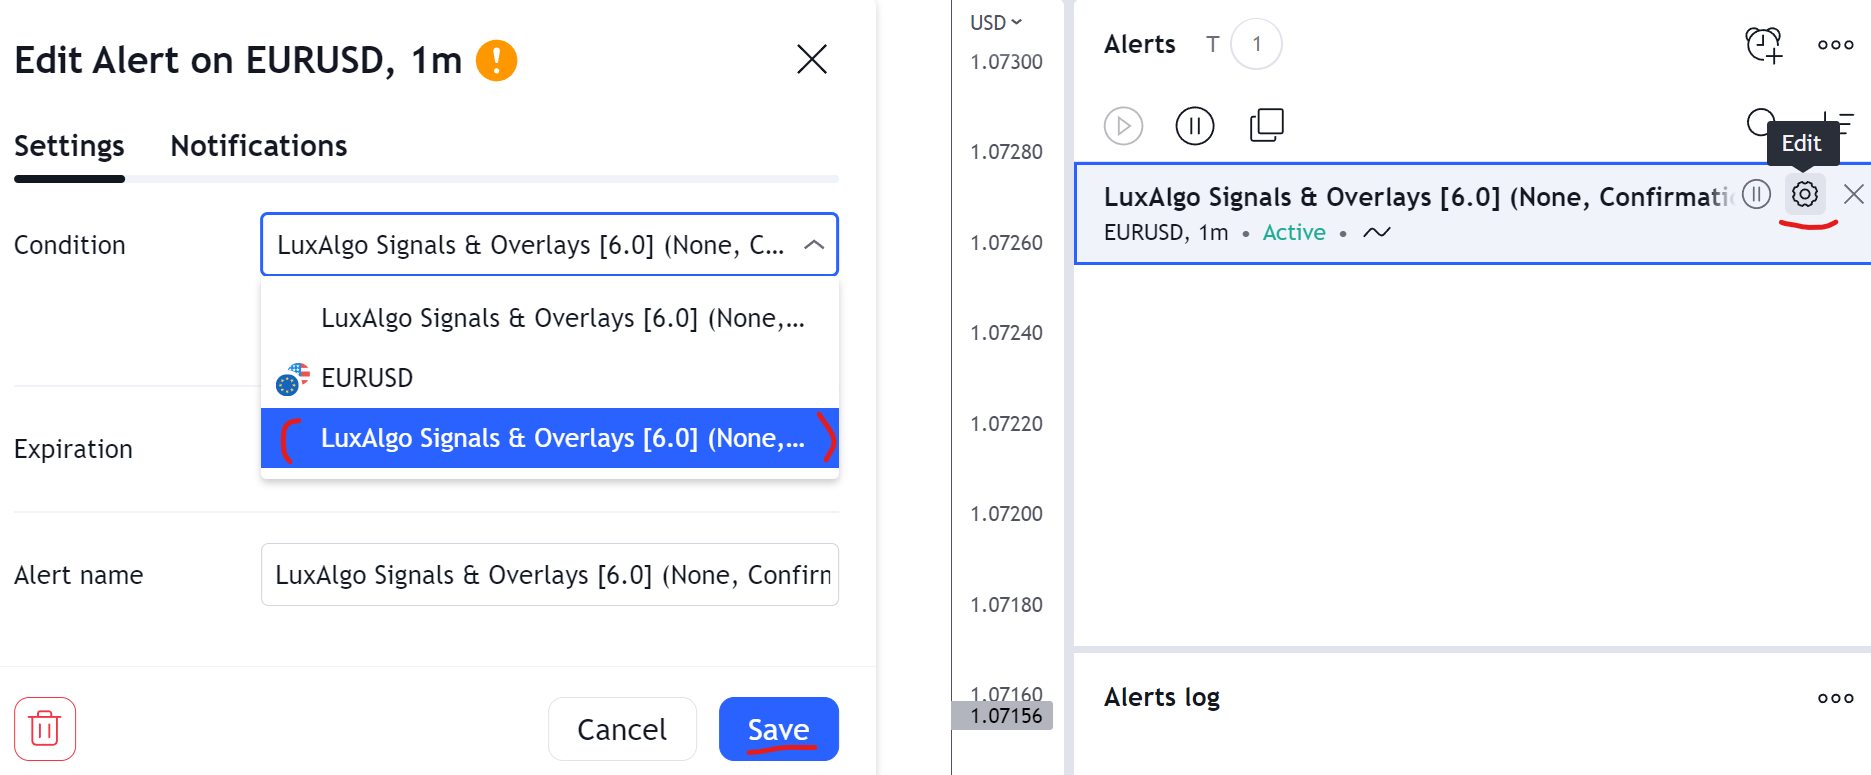
Custom Alert Creator
A user wishing to be alerted when any bullish signal occurs while the smart trail is bullish could do it as follows: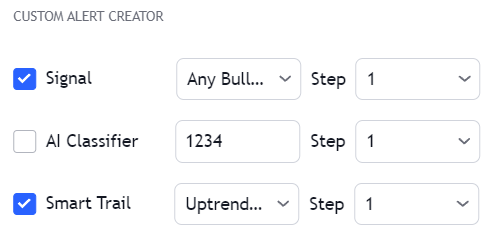
Steps
Steps allow creating a sequence of conditions, which when met trigger an alert. When a condition with a step equal to 1 is met the next condition associated with step 2 will be evaluated (if enabled) and so on for higher steps (if any). Conditions with the same associated step will require both conditions to be true in order for the condition associated with a higher step (if any) to be evaluated. This allows certain conditions to act as filters.A user wishing to be alerted for any bullish confirmation signal classified as 1 or 2 by the ML Classifier occurring after the smart trail turned bullish could do it as follows: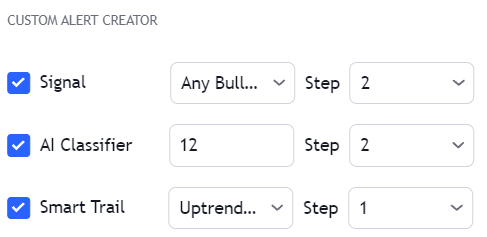
OR Step Operator
The “OR” step operator can be used to get alerted for any additional condition using “OR” as step, in addition to other set custom alert conditions. Conditions using the “OR” step can be highlighted using a different color, which can be set from the Custom Alert Creator settings. Users can choose the location of this visual element (top or bottom of the chart).All Step Operator
The “All” step operator can be used to filter any set “Step” condition, including “OR” and “Invalidate”. This step operator can be useful if all the steps in a sequence needs to obey a specific rule.Invalidate Step
The “Invalidate” step allows to set a condition as an “invalidation condition”. When this condition is triggered while a sequence of conditions is incomplete, the sequence will restart at step 1. If multiple steps are set as “Invalidate” any of the conditions being true will reset the sequence of conditions, as such not all of them are required to be true for the sequence of conditions to reset.Example
Let’s take an example where we use 2 regular steps and one “Invalidate” step. The alert will trigger when step 2 trigger after step 1 has been triggered.
1
Step 1
Step 1 condition trigger, we will now evaluate step 2 from now on.
2
Invalidation Step
Invalidation step condition trigger, we reset the sequence and evaluate step 1 just after.
Invalidation Behaviors
Invalidation behaviors allows adding more restrictions to a sequence of conditions, users can use two different invalidation behaviors described below:Invalidate On Step 1
The “Invalidate On Step 1” behavior allows to reset an incomplete sequence of conditions when the condition on step 1 trigger. This prevents the first step condition from happening in between other steps of the condition sequence. This behavior is useful when the first step of our sequence of conditions needs to never be repeated during the sequence.Example
Let’s take an example where we use 3 regular steps.
1
Step 1
Step 1 condition trigger, we will now evaluate step 2 from now on.
2
Step 2
Step 2 condition trigger, we will now evaluate step 3 from now on.
3
Step 1 Trigger
Step 1 condition trigger, we start evaluating step 2 from now.
Invalidate On Any Repeated Step
The “Invalidate On Any Repeated Step” behavior allows to reset an incomplete sequence of conditions when a step is triggered such that it does not respect the set order of conditions. This behavior is useful when we want a perfectly ordered sequence of conditions to complete, without any step repeating itself.Example
Let’s take an example where we use 3 regular steps.
1
Step 1
Step 1 condition trigger, we will now evaluate step 2 from now on.
2
Step 2
Step 2 condition trigger, we will now evaluate step 3 from now on.
3
Step 1 or 2 Trigger
Step 1 or 2 conditions trigger, we start evaluating step 1 from now.