Alert scripting is a good way to create more complex alerts without feeling limited by the number of conditions or their limited reusability. This page covers the syntax of scripted alerts as well as showcasing typical use cases for alert scripting.Documentation Index
Fetch the complete documentation index at: https://docs.luxalgo.com/llms.txt
Use this file to discover all available pages before exploring further.
Building Simple Conditions
Users can define a simple condition over a single line in the text area “Condition Input Field”. In order to build effective conditions, we will need to reference specific data using placeholders and compare this data with each other using operators. For example, we could define the following condition:{close}placeholder, referencing the current closing price value- Greater than operator
>, testing if the value to its left is greater than the value to its right {close[14]}refer to the value of the closing price ({close}) 14 bars ago (defined by the historical referencing operator[14])
True if the current closing price is higher than the closing price 14 bars ago.
Combining Conditions
Creating slightly more complex conditions can involve combining individual ones into a single one, allowing us to retain more precise events or on the contrary, loosen our condition rules.Combination using and
Using the operator and allows to require more than one “sub-conditions” to be valid for the whole to be true.
For example, we could reuse our previous condition but be more strict such that we only want to know when the current closing price is greater than the closing price 14 bars ago when it is between 1pm and 3pm (exchange timezone). To do this we can simply add another sub-condition leading to:
- current low price is higher than the high price two bars ago
- previous closing price is higher than the high price two bars ago
Combination using or
Sometimes we might be interested in getting alerted about two specific different conditions, without having to create two specific alerts. This is where or can be useful, requiring only one of the defined sub-conditions to be true in order for the alert to trigger.
For example, we could want to be alerted either on a strong bullish confirmation signal, or when the Smart Trail turns bullish, this could be easily achieved using the following script:
{bullish_confirmation+} is true when we have a strong bullish confirmation signal.
{bullish_smart_trail} when the Smart Trail is bullish, with the whole {bullish_smart_trail} and not {bullish_smart_trail[1]} being true when the Smart Trail is currently bullish while the previous Smart trail is not bullish.
or takes precedence over and. You can think of this as a way to split a whole condition into multiple sub-conditions.For example if we have {A} and {B} or {C} > 0 or {D} and {E}, the precedence of or would split this conditions leading to {A} and {B}, {C} > 0, and {D} and {E}.Each of these individual sub-conditions would be evaluated individually, if one of them is true, then our whole condition is true.Sequencing and Steps
Users can create sequences of conditions, triggering an alert when the last step in a sequence is true. Sequences are constructed using thethen operator, with each conditions seperated by then being a step. The first step is the leftmost one before then. When a step is valid, the next step condition will be evaluated at the next bar.
Once the last step is evaluated and is true, the sequence is completed which can trigger an alert (if set) and will switch to the first defined step on the next bar.
This is similar in practice to how the custom alert creator works.
- Step 1: High price is lower than the previous high price
- Step 2: Low price is lower than the previous low price
- Step 3: Closing price is lower than the opening price
Invalidation
Invalidation refers to re-evaluating from the first step of a sequence of conditions when one or more specific conditions are true.Invalidation takes place prior to evaluating steps.
!:
! is true, we go back to evaluating the sequence of conditions from step 1.
Another way to perform invalidation is using the method invalidate():
Step Specific Invalidation
It is possible to apply invalidation conditions to specific steps, this is done using thestep parameter in the @invalidate action.
To illustrate this, we can reuse our previous sequence of conditions:
{my_sequence.step} == 1 refer to the second step of needing to be the one being evaluated in the sequence to apply the invalidation condition {close} > {open}.
With steps, 0 refers to the first step because it is 0 indexed.
invalidate method can be done as follows:
invalidate(step=1) indicates that invalidation only takes place if the active step is the second one.
Invalidate on Step Evaluation Duration
Sometimes we might not want to keep evaluating one or multiple steps for an excessive number of bars, and instead prefer having each step being triggered with a short interval in between. This can easily be done using invalidation and the placeholderbarssince_step, which quantify the number of bars that elapsed since a step has started being evaluated or since invalidation took place.
For example, we can invalidate a sequence of conditions if the amount elapsed since a step is greater than 5 bars:
Visualizing Scripted Alerts Conditions

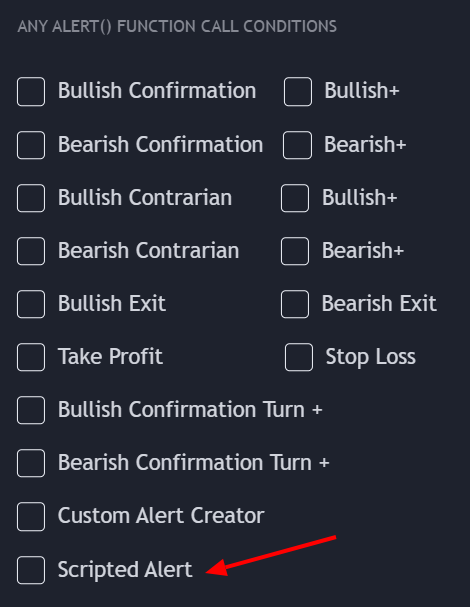
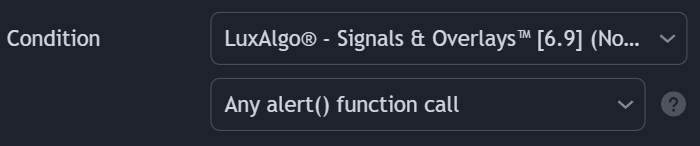
Setting Scripted Alerts
Comments
To make a scripted alert easier to read, users can add comments by starting a line with//.
Comments will be ignored when a scripted alert is evaluated.
For example: